[Tricks][bigposts]

How to install windows 7 with windows 8 pre-installed

Your newly purchased computer or the one you just built has Windows 8 installed. You now want to install Windows 7 as a second operating system thus creating a Dual Boot computer and giving you the best of both worlds and full app compatibility as some of your Windows 7 applications may not be supported in a Windows 8 environment.

Why disable ‘Fast Startup’:

Failure to disable the fast startup option can result in ‘Check Disk’ (chkdsk) running when installing Windows 7. You may also no longer see the dual boot menu the next time you turn on your computer. Also if you have more than 1 disk drive chkdsk will run each time you shut down from within Windows 8 and then boot to Windows 7.
Fast Startup in Windows 8 is designed to close and reopen by fast booting (Hybrid Boot), it has left your system in a partially hibernated state, with the drive mounted and according to Microsoft "effectively saving the system state and memory contents to a file on disk (hiberfil.sys) and then reading that back in on resume and restoring contents back to memory."
Turning off the “fast startup/hybrid boot” option fixes the chkdsk problem during the installation of Windows 7, the missing boot menu problem (more on this later) and the multiple disk drives “Dirty bit” issue when booting to Windows 7.Windows 8 may take little longer to boot but not all that much as to be meaningful. Boot times for Windows 7 are unaffected and the boot menu will be displayed each time you turn on or reboot the computer.

How to disable ‘Fast Boot’:
Make the following changes to the Windows 8 Power Options.
1. Control Panel --> View by: Small Icons -->Power Options
2. Select "Choose what the power button does" on left hand side.
3. Click on "Change settings that are currently unavailable".
4. Uncheck "Turn on fast startup" under shutdown settings.
5. Click on the ‘Save changes’ button.

Using Disk Management to create a partition for Windows 7:
1) Open Windows 8’s ‘Disk Management’ (press and hold the ‘Windows’ key and tap the X key). Then select the ‘Disk Management’ (or tap the ‘K’ key) option from the list.

2) Change the ‘Volume name’ to “Windows 8 Pro” (Without the quotes). Right click on the Windows 8 partition (C:) and select ‘Properties’. In the ‘General’ tab change the existing name to: Windows 8 Pro and click the ‘Apply’ button.

3) Shrink the Windows 8 partition to create unallocated space for use when installing Windows 7. Right click on the Windows 8 partition (C:) and select the ‘Shrink Volume’ option. Now enter a value for the amount of space to shrink in MB. For the 931GB partition in this example I wanted to create a 460GB partition for Windows 7, so I entered a value of 471040 (460 X 1024). If your Windows 8 partition contains a lot of data you want to consider a smaller partition size for Windows 7 (75 to 100GB).

Click the ‘Shrink’ button to start the process. After the shrink operation has completed you will see 460.00GB in “Unallocated” space.

4) Create a “Primary” partition and format it. Right click on the unallocated space and select ‘New Simple Volume’.

In the “Format Partition” window you want an ‘NTFS’ partition, leave the allocation unit size set to ‘Default’ and either choose a ‘Quick’ or ‘Full’ format. I prefer a full format (takes longer to complete, but it’s safer) so as the screenshot below shows, the ‘Perform a quick format’ option is unchecked. Click ‘Next’ to continue.

5) Change the volume name to Windows 7 (or Windows 7 Pro or Windows 7 Ult if Home Premium is not what you are installing). This will make it easy for you to select the proper location on the drive during the Windows 7 installation process.

6) At this point I created another Image Backup of the drive (all partitions) using Todo Backup. This allows me or you to return to the current state should Windows 7 fail to install properly the first time around.

6) At this point I created another Image Backup of the drive (all partitions) using Todo Backup. This allows me or you to return to the current state should Windows 7 fail to install properly the first time around.
7) You are now ready to install Windows 7. This will be a “Keyless” install, should anything go wrong your Windows 7 product key will not have been used or activated and you can try again.
For reference purposes a “Keyless” install simply means you will skip entering in a product key during the install and activate Windows 7 at a later point in time. More on this subject later.
I’m not going to show you screenshots for each step in the installation of Windows 7 as this has been documented many times.


Installing Windows 7


Step 1 - Insert the Windows 7 installation DVD into your DVD drive and restart the computer. When you see the prompt to ‘Press any key” to boot from the DVD, do so. Windows 7 will start to boot up and you will see the following progress bar “Windows Is Loading Files” followed by the “Starting Windows” logo.
Step 2 - The next screen allows you to setup your language, time and currency format, keyboard or input method. Choose your required settings and click next to continue.
Step 3 - The next screen allows you to install or repair Windows 7. Since we are doing a clean install, click on "install now". The ‘Setup’ process will then start.

Step 4 - Read the license terms and click ‘I accept the license terms’. Then click ‘Next’ to continue.
Step 5: What type of Installation do you want: There are two options to choose from, Upgrade or Custom (Advanced). Since you are doing a clean install, select the second option ‘Custom (Advanced)’.
Step 6: Choose where you would like to install Windows 7. Since the drive already has been partitioned, formatted and assigned a volume name (Windows 7 Pro), all you need to do is select the third / Windows 7 Pro partition (since that’s what I’m installing) and click ‘Next’.

Step 7 - Windows 7 starts the installation process and begins by copying and expanding all the necessary files to your hard drive or SSD.
Step 8 - The installation will go through various setup stages and then will reboot your system.
Warning: Each time your computer reboots it will prompt you to boot from the DVD. Take no action on your part, please do not touch that keyboard, even though you are prompted to “press any key to boot from CD or DVD” just let the computer boot on its own and the installation will automatically continue.
Step 9: The next set of tasks are completely automated and no user intervention is required. You will see a starting Windows logo.
Note: If you failed to Disable Windows 8’s ‘Fast Start’ option, ‘chkdsk’ may run immediately after a reboot, check each partition on your drive and then reboot again to continue the installation.
At this point “Setup is updating registry settings” message quickly followed by a “Setup starting services” message, finally the “Completing installation” message is displayed (your display may flicker). Your computer will then reboot at this point in the installation process.
Setup will now prepare your computer for first use and check your video performance.
10) You will now be prompted to enter a user name and a computer name. Your username will be will become the prefix for the computer name. Click the ‘Next’ button to continue.
11) Set a password for your account:  Choose your password and password hint just in case you forget the password and need to jog your memory.
12) This step is where you perform a “Keyless Install”.
You could at this point enter the product key that came with the version of Windows 7 you are installing and then click ‘Next’. But wait, if you choose to activate Windows now and something should go wrong anywhere in the process of installing Windows, installing the device drivers or installing the latest Windows Updates and as a result forcing you to start fresh by reinstalling Windows from scratch, the next time you try to activate it will most likely fail and phone activation will be required; not a good idea, especially if there is a better way.

Keyless Install:

If you do not enter the product key and remove the checkmark from the “Automatically activate Windows when I'm online” box, you can still proceed with the installation process without entering your product key. After the installation has completed, Windows 7 will run in a trial mode for 30 days, this should be more than enough time to install the device drivers, all the Windows Updates, configure and test your dual boot computer before you need to activate Windows.

13) Help protect your computer and improve Windows automatically:
Choose ‘Ask me later’, there is no need to be flooded with Windows Updates after the installation has completed.
14) Set the ‘Time zone’, Date and Time for your location. Note: Because you have performed a “Keyless Install” it is very important that you set the Time zone, Date and Time correctly.
Then click ‘Next’.
Note: Changing these settings after the install has completed could result in instantly using up your 30 day grace period.
15) Select your computer's current location: Home users should choose ‘Home network’ option, otherwise pick one of the appropriate remaining two options. Windows will now connect to your network and apply the settings.
16) Select what you want to share if a network is detected and enter a password or simply click ‘Skip’.
17) Windows will finalized your settings, prepare your desktop and finally display the Windows 7 style desktop with a “Real” start button in the lower left corner of the ‘Taskbar.
18) The bland grayish color of the toolbar (Non Aero) is a dead giveaway that the graphics card driver has not been installed. Other device drivers will also need to be installed.
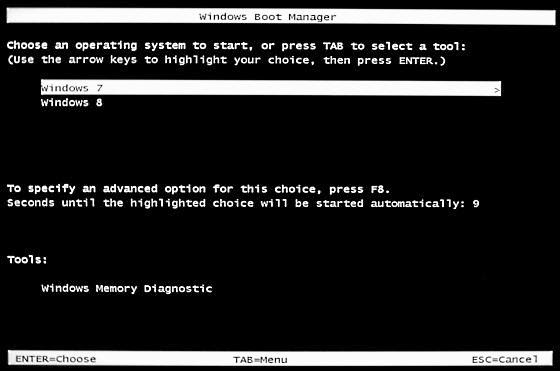
19) Remove the Windows 7 installation DVD and reboot to Windows 8 and create another backup before installing any Windows 7 device drivers. You will note the boot menu now takes on the look of a typical Windows 7 dual boot display with Windows 7 at the top of the list and it is also the ‘Default’ OS that will load if no choice is made before the 30 second timeout.
Use the ‘Down’ arrow on the keyboard to select Windows 8 and press the ‘Enter’ key.

20) Reboot to Windows 7 and install your device drivers.


Missing boot menu after reboot?


You may notice that on powering down from Windows 8 (not Windows 7) and then booting the computer later in the day or the next morning that the boot menu is missing and the PC boots straight to Windows 8.This is caused because you forgot to disable the ‘Fast boot’ option prior to installing Windows 7.
To fix this issue make the following changes to the Windows 8 Power Options.
1. Control Panel --> View by: Small Icons -->Power Options
2. Select "Choose what the power button does" on left hand side.
3. Click on "Change settings that are currently unavailable".
4. Uncheck "Turn on fast startup" under shutdown settings.
5. Click on the ‘Save changes’ button.
6. You may now be able to boot from either windows 7 or windows 8 from boot menu.

Verify you can boot to either version of Windows using either the reboot option or from a cold start.

No comments:

Post a Comment

Networking

[Networking][bigposts]